Installing MS SQL Server 2019 Express
This howto guide explains how to download, install and configure the backing storage for MS SQL Server 2019 Express. I used it to test if MS SQL server runs atop of WinDRBD.
First, download the installer from this Location
Run the installer as Administrator (EVEN if you are logged in as Administrator) To do so,
- Locate the Downloaded File in explorer (it is usually downloaded into the Downloads directory)
- Right Click the File and select Run As Administrator
- Select Basic Settings
- When prompted for the License click Accept
- Wait about 10 - 15 minutes
Then Install SQL Server Management Studio from this Location. It will be used to configure the location of the database files.
When installation is finished, start Management Studio (from the Start Menu). Connect to the database with Windows authentication. If you cannot log in try to disable encryption (lower part of login window). Then:
-
Right Click Top Entry in TreeView, which should display the hostname of your node and the instance name as in mywindowsbox\SQLEXPRESS01
-
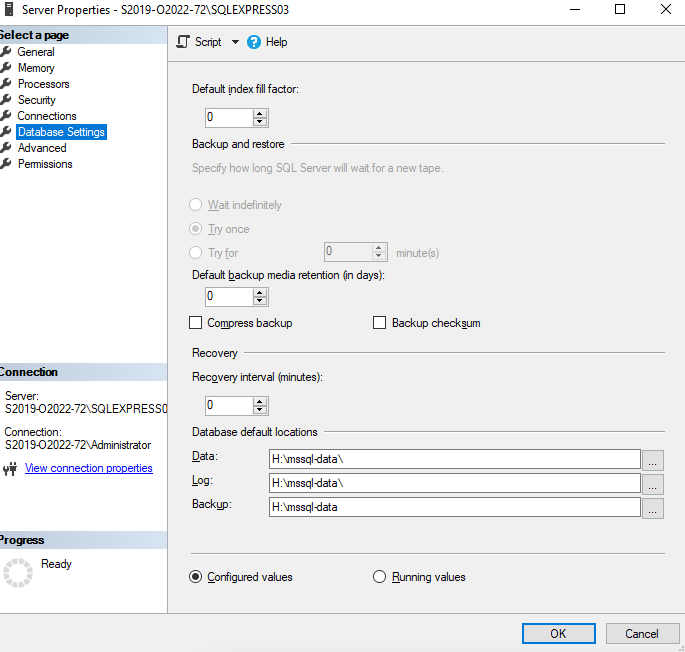
Select Properties, then Database settings, you can edit the Path names here, as shown in the screenshot below:

Then restart instance: This is how it is done from the command line:
sc stop MSSQL$SQLServerExpressInstanceName
sc start MSSQL$SQLServerExpressInstanceName
SQLServer instance name is something like SQLEXPRESS01 (note: you have to quote the $ in bash so in bash it is:
sc stop MSSQL\$SQLServerExpressInstanceName
sc start MSSQL\$SQLServerExpressInstanceName
Restart instance always when changing the file locations or for example when disk was offline and got online again.
Note: restart is also possible via GUI: right click instance and select restart.
Adding more SQL Server Express instances
For adding SQL Express instances you need to re-run setup. (again with Run As Administrator). On the license view there is a warning about the existing instance but you can continue there.
To connect to a new instance in SQL Server Management Studio, select File / Connect Object Explorer and enter the new server\instance name (instances are SQLEXPRESS01, SQLEXPRESS02 and so on)
HammerDB
HammerDB can be downloaded from:
https://github.com/TPC-Council/HammerDB/releases/download/v4.2/HammerDB-4.2-Win-x64-Setup.exe
To set ODBC driver name and connection string, go to:
SQLServer / TPROC-C / Options then a window should pop up (if not, just restart HammerDB) where you need to set the SQL Server (hostname\instancename for example S2019-M2024-5\MSSQLSERVER03) and the driver name.
Use the odbcad32.exe program to find out about installed ODBC drivers (Drivers tab).
Sample CLI session
Finally I show a short interactive SQL session:
sqlcmd -S Hostname\InstanceName
Note: if you are in bash add an extra \ as in:
sqlcmd -S Hostname\\InstanceName
Then after all SQL commands, type go<ENTER>
create database tmp
go

use tmp
go

create table tmp ( x integer, y integer )
go

insert into tmp values ( 1, 42 )
go

select * from tmp
go
That’s it!